Orchids are beautiful yet delicate plants that require special care to thrive, and repotting is a crucial part of their maintenance. If you’ve ever wondered how to replant an orchid without causing harm, you’re not alone. Many orchid owners fear killing their plants during this process, but with the right steps, it’s entirely achievable. This guide will walk you through everything you need to know—from the best timing and essential materials to a detailed repotting process and vital aftercare tips. Let’s dive in with confidence and ensure your orchid continues to bloom beautifully!
When Should You Repot Your Orchid?
Timing is everything when it comes to repotting orchids. Knowing when to repot an orchid can make the difference between a thriving plant and one that struggles to recover. Orchids aren’t like typical houseplants; they have specific needs tied to their growth cycles and potting medium.
Here are some key indicators that it’s time to repot your orchid:
- New Plant Acquisition: If you’ve just brought home a new orchid, it’s wise to repot it right away to ensure it’s in a suitable medium and pot (source).
- Every 1-2 Years: As the potting medium breaks down over time, it loses its ability to provide proper aeration and drainage. Repotting every 1-2 years refreshes the environment for your orchid’s roots (source).
- After Flowering: The ideal time to repot is after the orchid has finished blooming and new growth appears. This minimizes stress on the plant (source).
Most orchids benefit from repotting every two years to keep the potting medium fresh and supportive of healthy root growth (source). Pay attention to your plant’s signals, such as compacted or decaying bark mix, to determine the right moment.
What You’ll Need to Replant an Orchid Successfully
Preparation is key to a smooth repotting process. Having the right orchid repotting supplies on hand will help you avoid unnecessary stress for both you and your plant. Orchids have unique requirements, so don’t skimp on gathering the proper tools and materials.
Here’s a list of essentials you’ll need before you start:
- New Pot: Choose a pot that’s 1-2 inches larger in diameter than the current one to allow room for growth (source).
- Orchid-Specific Potting Mix: Use a mix formulated for orchids, typically containing bark, perlite, and horticultural charcoal for optimal drainage and aeration (source).
- Clean Pruning Shears or Scissors: These are necessary for trimming unhealthy roots without introducing infection.
- Plant Stake or Chopstick: This helps anchor the orchid in its new pot for stability (source).
- Large Container with Tepid Water: Needed for soaking the potting mix after repotting (source).
One critical note: never use regular indoor potting soil for orchids. Unlike typical houseplants, orchids require a porous medium that allows air circulation around their roots. Standard soil can trap moisture and lead to root rot, a common cause of orchid decline (source).
Step-by-Step Guide to Replanting Your Orchid
Now that you’ve gathered your supplies and determined the right time, let’s get into the nitty-gritty of how to replant an orchid without killing it. Repotting might seem daunting, but breaking it down into manageable steps makes it straightforward. Follow this guide closely to ensure your orchid transitions smoothly into its new home.
Step 1: Removing the Orchid from Its Current Pot
The first step is to carefully remove your orchid from its existing container. Be gentle to avoid damaging the roots or stems. If there’s a plastic liner inside the pot, take that out as well (source).
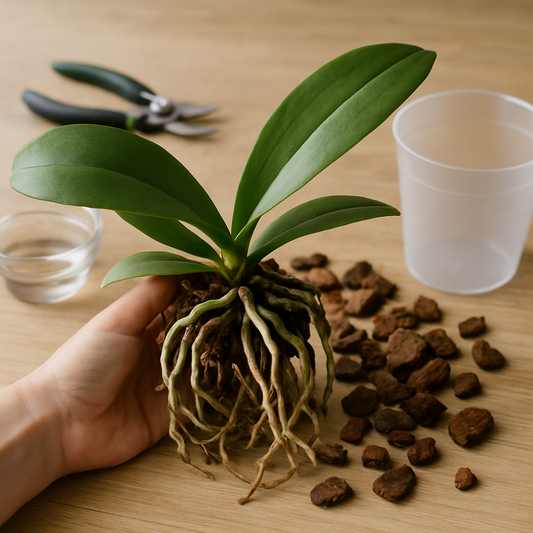
Once the plant is out, gently dislodge the roots from the old potting medium. If the roots are tightly packed, take your time to loosen them without breaking healthy ones. Many store-bought orchids come with sphagnum moss packed around the roots for shipping—remove this moss completely as it can retain too much moisture and harm the plant long-term (source; source).
Step 2: Preparing and Caring for the Roots
With the orchid free from its old pot, it’s time to focus on orchid root care. Inspect the roots closely for signs of health or damage. Healthy orchid roots are firm and appear light green to white when dry, or bright green when wet. In contrast, dead or rotted roots often look brown or feel soft and mushy (source).
Use clean pruning shears to trim away any unhealthy roots. This step is crucial to prevent rot from spreading and to encourage new, healthy growth. Be cautious and only remove what’s necessary, ensuring your tools are sanitized to avoid introducing bacteria (source).
Step 3: Planting in the New Container
Now comes the exciting part of repotting an orchid step-by-step: placing it in its new home. Start by filling the new pot about halfway with the orchid bark mix. This creates a base for the roots to rest on (source).
Set the orchid’s root ball onto the bark, carefully spreading the roots out to ensure they’re not cramped. Insert a plant stake or chopstick next to the plant through the mix to help anchor it in place. Then, gently add more bark mix over the roots until it reaches about 1/2 inch below the top edge of the pot. Avoid packing the mix too tightly—orchid roots need space to breathe (source).
Post-Repotting Care Tips to Keep Your Orchid Thriving
Once your orchid is snug in its new pot, the work isn’t over. Proper orchid care after repotting is essential to help the plant adjust and prevent transplant shock. The first few days are critical, so follow these steps to give your orchid the best chance to thrive.
Start by immersing the entire pot in tepid water for about 20 minutes. This ensures the bark mix is thoroughly soaked and provides initial hydration to the roots (source). After soaking, lift the pot out, let excess water drain, and place the orchid back in its usual spot with appropriate light and temperature conditions (source).
Resume your normal care routine, such as watering and fertilizing, but be patient. Your orchid may need some time to acclimate to its new environment. Watch for signs of stress, like drooping leaves, and adjust care as needed while it settles in (source).
Key Considerations to Avoid Common Mistakes
Repotting an orchid is a delicate process, and there are several common orchid repotting mistakes to avoid. Understanding these pitfalls can help ensure your plant remains healthy and vibrant after the transition.
- Remove Sphagnum Moss: Many orchids purchased from stores come with roots packed in sphagnum moss for shipping. This material retains too much moisture and can suffocate roots if left in place, so always remove it during repotting (source).
- Ensure Air Circulation: Orchid roots need air to thrive. Keeping them constantly wet or using a non-porous medium can lead to rot. Stick to orchid-specific mixes that promote drainage and aeration (source).
- Refresh the Medium Regularly: The potting medium breaks down over time, usually within about two years. Regular repotting or refreshing of the bark mix is necessary to maintain the plant’s strength and prevent root issues (source).
By keeping these considerations in mind, you’ll avoid the most frequent errors and set your orchid up for long-term success.
Repotting Your Orchid with Confidence
Repotting doesn’t have to be a daunting task. With the right timing, preparation, and attention to detail, you can replant an orchid successfully without risking its health. Remember the essentials: repot every 1-2 years or after flowering, gather the proper supplies, follow the step-by-step process, and provide gentle aftercare to help your orchid adjust. This rewarding process supports your plant’s long-term growth and blooming potential.
We’d love to hear about your repotting journey! Share your experiences or ask any questions in the comments below—I’m here to help you nurture your orchid with confidence.


